복구영역 삭제 방법
간단하니 따라만 해도 충분.
삼성노트북 기준이나 LG M1 노트북 복구영역 삭제 가능.
단, 일단 삭제하면 다시 살릴 수 없으니 충분히 생각하고 지우도록 하자.
How-to delete the hidden recovery partition on Samsung 9 Series laptop
How to delete recovery partition on Samsung 9 series laptop.
The Samsung 9 series laptop has got a hidden partition (23Gigs in size) which is used by Samsung Recovery Software. This recovery partition is really used only when you need to get your laptop back to to state when you bought it. Since it’s quite nice to have it… just in case, it takes a valuable space on not so big 128Gigs SSD which was present when I bought this laptop last year. See my article on it - New Working (blogging) Gear has arrived.
The 23 Gigs of non used space did not bothered me, just until recently, when I was left with only 4 gigs free on my C: drive. It’s mostly because I store the vSphere Lab in the box files on the drive. Since the begining I was using my Acronis Home to backup the c: partition and store this backup file on my USB drive. The Acronis software was bundled with my first SSD ever, which I bought from Kingston two years ago.
And when I bought the laptop, the first think to do was an Acronis backup. So I do have backup with clean state of my laptop stored on my USB drive. If you don’t, then you should keep that partition.
The hidden recovery partition which is present on the new laptop cannot get deleted through the computer management snap-in. It’s because the partition is locked and protected against accidental deletion.
How to get this partition deleted?
Here are the steps:
01. Open command prompt window with administrative privilegies and type diskpart
02. In the “Diskpart” prompt, enter rescan command and press Enter key to re-scan all partitions, volumes and drives available.
03. Then type in list disk and press Enter. This command shows you all the disks present on your system. In my case I had only one disk, so in the image bellow you’ll see that my disk was disk 0
04. Next type select disk 0 (because I had only 1 disk – depending on your system). Press Enter.
05. Type list partition and press Enter key to show all available and created partition in the disk selected.

As you can see, the partition which I needed to delete is the third partition.
06. Type select partition 3 and hit enter.
07. Last step, type in delete partition override and press Enter key.
08. Go to the computer management and Expand the C: partition by right clicking the C: partition. You’ll resize that partition and obtain an additional 22-23 Gigs of space.
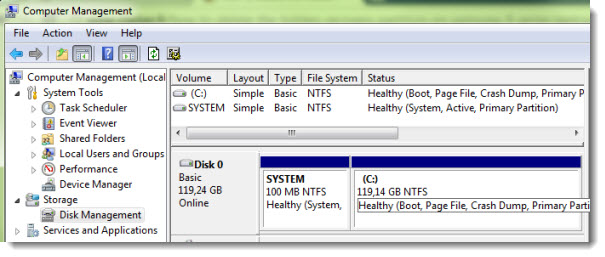
So at the end you should end up with partitions layout like this, which is a default Win 7 partitions layout.

원 링크
http://www.vladan.fr/how-to-delete-the-hidden-recovery-partition-on-samsung-9-series-laptop/

